
Powerline Pass Trail Photos


More like Powerline Pass Trail
Recommended Reviews - Powerline Pass Trail
Start your review...

4 years ago
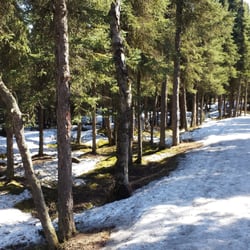
Many thanks to Andrew and Daniella for their thorough reviews that ultimately gave me the balls to bring my 3 kiddos out here by-myself. I have not been to the Glen Alps in at least 5 years. The additional parking lot was totally new to me. I recommend skipping the main lot and parking there. I ended up having to leave my eldest two on a rock, so I could grab the car in the main lot and pick them up. They were so done with me! haha I pushed my toddler in a City Mini GT (all-terrain stroller) the entire time. I like to hike, but I've yet to invest in those fancy backpack toddler holders (see, I don't even know what they're called). It was my goal for us make it to the infamous bridge and back. We did it. I'm so damn grateful. I don't have a dog, a gun or bear spray (yet). I depend on a simple bear bell, my super loud Bluetooth speaker, and the protection of my ancestors, angels, and spirit guides. Luckily, we saw other hikers often. We were never alone for too long. Still lots of snow melting. The trail was still very wet and muddy in some spots. We did not have waterproof boots so naturally we left soaked from the calves down. It was worth it. Highly recommend. read more


You may not know the name "Powerline Pass Trail", but you've probably been on it before. It's often used as a sort of "trail hwy" to access other, more desirable trails. It starts at the Glen Alps trailhead. (same as the most popular hike in Alaska, Flattop: https://www.yelp.com/biz/flattop-mountain-trail-anchorage-2) The Powerline Pass trail itself goes all the way to the actual Powerline Pass (the big mountain on your left/north is Avalanche Mountain https://www.yelp.com/biz/powerline-pass-trail-anchorage, the one on your right/south is Homicide Peak) and then goes south, towards the Turnagain Arm and ends at the Indian Trail Valley Trail (https://www.yelp.com/biz/indian-valley-trail-anchorage). There are also various offshoots including (from Glen Alps): Williwaw Lakes Trail (https://www.yelp.com/biz/williwaw-lakes-trail-anchorage): at about 0.5 mile, take a left, then take a left at the fork in about a mile. O'Malley Trail (https://www.yelp.com/biz/o-malley-peak-trail-anchorage): same as above, but take a right at the fork Hidden Lake Trail: at about 4ish miles in, take a left Great place to use as a hub. If you just want to get out of the city and move your legs, this is a great trail to do a mile or two on. Doing it as a trail in and of itself, it's a little boring on foot. The real thrill of this trail is doing it on a mountain(or fat) bike or skis. read more


7 years ago
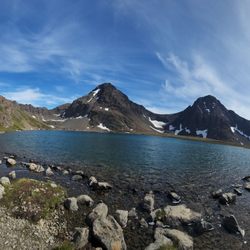
This is a great trail for everyone, but especially families with small children because it's fairly flat, and a wide well marked trail. It's also very good for biking for the same reasons. This trail is easy to access as you park at the glen alps trailhead the same as you would to hike flat top. Only problem is parking is sometimes hard to come by as this is an extremely popular area to hike/bike. All trails has this trail listed as 11 miles point to point, but you can hike to whatever area you'd like and then turn around, which is what we typically do. There are also many other moderate/difficult hikes that start from the Powerline pass trail such as Williwaw lakes, hidden lake, Wolverine peak, O'Malley peak etc. I like this area because there's access to so much of the Chugach state park, and you can kind of make the hike whatever you want depending on how you feel that day. This area is extremely beautiful, and you have a very good chance of seeing moose, dall sheep and possible bear sighting. This is a great trail to hike all seasons, but be prepared if you plan to do any winter hiking!! read more


7 years ago
More info about Powerline Pass Trail


Powerline Pass Trail - hiking - Updated July 2026
Best of Anchorage
People found Powerline Pass Trail by searching for…
Swimming Lakes in Anchorage, AK
Used Outdoor Gear in Anchorage, AK
Dog Friendly Trails in Anchorage, AK
Walking Trails in Anchorage, AK
Things to Do at Night in Anchorage, AK
Off Road Trails in Anchorage, AK
Hiking Trails in Anchorage, AK
Toddler Playground in Anchorage, AK
Free Campgrounds in Anchorage, AK
Scenic Overlook in Anchorage, AK
Waterfall Hike in Anchorage, AK
Trending Searches in Anchorage, AK
Beautiful Views near Powerline Pass Trail
Boat Tours near Powerline Pass Trail
Day Trips near Powerline Pass Trail
Dog Friendly Trails near Powerline Pass Trail
Free Picnic Areas near Powerline Pass Trail
Kayak Rental near Powerline Pass Trail
Off Road Trails near Powerline Pass Trail
Outdoor Activities near Powerline Pass Trail
Parks near Powerline Pass Trail
Parks For Picnics near Powerline Pass Trail
Places To Swim near Powerline Pass Trail
Public Shower near Powerline Pass Trail
River Swimming near Powerline Pass Trail
Rock Quarry near Powerline Pass Trail
Scenic Overlook near Powerline Pass Trail
Soccer Store near Powerline Pass Trail
Sunrise View near Powerline Pass Trail
Swimming Holes near Powerline Pass Trail
Swimming Lakes near Powerline Pass Trail
Browse Articles
Browse Brands
Related Searches in Anchorage, AK
Affordable Bike Repair Services in Anchorage, Alaska
Affordable Kayak Rental Services in Anchorage, Alaska
Best Dirt Bike Riding Spots in Anchorage, Alaska
Best Dog Hiking Trails Around Anchorage, Alaska
Best Fishing Locations and Guides in Anchorage, Alaska
Best Nature Trails for Hiking in Anchorage, Alaska
Best Places for Horseback Riding in Anchorage, Alaska
Best Sightseeing Experiences Available in Anchorage, Alaska
Best Sledding Spots and Fun in Anchorage, Alaska
Check Out Off Road Trails in Anchorage, Alaska
Convenient Bike Sharing Programs in Anchorage, Alaska
Discover Dog Friendly Trails to Explore in Anchorage, Alaska
Discover Popular Bike Tours in Anchorage, Alaska
Discover Popular Bike Trails in Anchorage, Alaska
Discover Scenic Mountain Bike Trails Near Anchorage, Alaska
Discover a Hiking Trail in Anchorage, Alaska
Discover the Best Beaches in Anchorage, Alaska
Discover the Best Night Hike Trails in Anchorage, Alaska
Dog-Friendly Hikes With Dogs in Anchorage, Alaska
Enjoy Camping Adventures Around Anchorage, Alaska
Enjoy Exciting Mountain Biking Adventures in Anchorage, Alaska
Enjoy Hiking Adventures in Anchorage, Alaska
Enjoy Kayaking Adventures in Anchorage, Alaska
Enjoy Off Leash Dog Hikes in Anchorage, Alaska
Enjoy Tent Camping Spots Around Anchorage, Alaska
Enjoy a Beautiful Waterfall Hike in Anchorage, Alaska
Enjoy the Best Tubing Experiences in Anchorage, Alaska
Enjoy the Best Walking Trails in Anchorage, Alaska
Exciting Things to Do in Anchorage, Alaska Today
Explore Beautiful Parks and Green Spaces in Anchorage, Alaska
Explore Bike Rentals Throughout Anchorage, Alaska
Explore Easy Hikes Perfect for All in Anchorage, Alaska
Explore Fun Activities to Do in Anchorage, Alaska
Explore Popular Campgrounds Near Anchorage, Alaska
Explore Popular Scenic Overlook Points in Anchorage, Alaska
Explore Popular Scenic Views Near Anchorage, Alaska
Explore Scenic Lakes to Visit in Anchorage, Alaska
Explore Secret Spots Worth Visiting in Anchorage, Alaska
Explore Top Dog Parks in Anchorage, Alaska Near You
Explore the Best Rock Climbing Areas in Anchorage, Alaska
Family Friendly Hiking With Kids in Anchorage, Alaska
Find Cozy Camping Cabins in Anchorage, Alaska
Find Exciting Tours to Take in Anchorage, Alaska
Find Specialized Bikes and Accessories in Anchorage, Alaska
Find Top Mountain Bike Rental Options in Anchorage, Alaska