Old Mt. Baldy Trail Photos


You might also consider
More like Old Mt. Baldy Trail
Recommended Reviews - Old Mt. Baldy Trail
Start your review...

Reviews With Photos


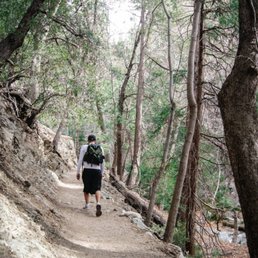
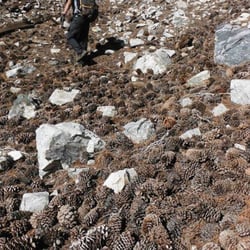
This is not something you just wake up and say, "let's do this," proper training is required. The Old Mt. Baldy trail is the most difficult trail to the Mt. Baldy's summit, and is an entirely different experience than the more popular Devil's Backbone and Ski Hut trails, which are also a challenge, but much easier in comparison. The Old Mt. Baldy (aka Bear Canyon) trail starts at Mt. Baldy village at the end of Bear Canyon Rd, unlike the other two trails which both start at Manker Flats. Old Mt. Baldy is a cardiovascular challenge, with nearly an additional 2,000 ft of elevation gain compared to the other two options, and is a 13+ mile round trip. Currently, the parking area for Old Mt. Baldy is about 1/4 mile North from Bear Canyon Rd on the left hand side. You should park across the street from the Mt. Baldy Lodge Restaurant, or up the street. To play it safe you might want to invest in a $5 parking pass. WARNING, Bear Canyon Rd is a private road, and parking there is prohibited. Make sure to bring enough water during the Summer as most of the trail is exposed to the sun. Hiking any of the summit trails during the Winter is also only recommended if you have winter mountaineering experience due to icy sections with steep drop offs in some areas. Pro tip; bring plenty of hiking appropriate rations, lots of water, and ensure your shoes are properly broken in and that you have adequate socks with plenty of cushion. Several people in my group experienced severe toe bang on the way down and will assuredly lose their toenails. Take your time and enjoy the beauty, this is a LONG but rewarding day. It took 5+ hours for my group going up, and 3+ hours coming down, you can assume a 8+ hour round trip, less if you rush it, but why not enjoy the journey?

This is specifically for the Ice House Trail - very pretty hike at about 7.5mi round trip. Love that the first mile will allow you to enjoy a full flowing stream which was very refreshing against the heat. The trail gets a little harder and steeper on its last 1.5mi so come prepared with tons of hydration and snacks. Very picturesque hike with different views of the area along the way. Parking was very easy and there weren't much people when we came at around 1pm on a Friday. The hikers in this area are also the most polite compared to those on other trails! People observe social distancing and about 95% have masks and cover up when close by.

I hiked this amazing route on September 28. Arrived at Manker Flats a little after 7 am and it was very cold at the trailhead. Warmed up to a crisp and comfortable high fifties I'd guess for the rest of the day. Extremely windy near and at the summit. Delicious burger at the Notch and a well earned beer preceded the last few miles down to Manker for a Strava reported 13.5 miles, 4,107' of elevation. No bugs. Yeah! This was probably one of the hardest hikes I've done. I would absolutely recommend this to anyone looking for a substantial but doable challenge. It's very easy to follow the route especially when there are so many other people around. That's probably the only downside to this hike - it's not much for solitude but there is a real spirit of comradely adventure and support from your fellow hikers.

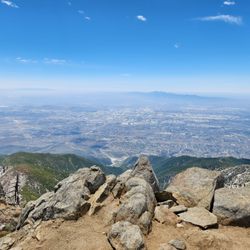
Oh boy, I didn't realize how brutal hiking could be before I started the six peak challenge with my friends. So far I've completed 4 of the 6 peaks (Cucamonga, Baldy, Mt. Wilson, & San Jacinto) and out of those 4 this one was the toughest to me. We ended up taking the 4 mile scenic tail which is shorter in distance than the other trial which makes the elevation climb a lot harder. Tougher than the climb is the actual trail, as you get closer to the peak in terms of miles the trail ground is a kind of loose so it's harder to just put your feet down and force your way up the hills, you have to pick your spots carefully so you don't lose your footing. You're not in any danger of falling off the side of s cliff or anything, it's just tiring to slide down a little, then regain your footing & keep it going up the steep climbs. Once you make it up to the top there's a great 360 degree view up above. Views of the city below, and mountains beyond & all that other crap you explore the heights of nature for. On your way back down, don't expect to leave the trail quicker than you came, even though you're going down hill it's still a steep climb back down so you have to be just as careful heading back as you were going up. Happy trails folks (Stupid pun intended)


Fantastic hike on a day after Christmas. Mt. Baldy Trailhead is one of the few family friendly hiking trails in The Angeles National Forest. It's a great trail for all ages. There is an amazing waterfall that's just 10 minutes hike from the parking lot. I saw many families with kids play around at the water fall. I suspect they will just spend their time here. For hikers, another easy to moderate 3.2 miles hike will get you to the notch on top. There is a nice coffee shop there serving coffee and sandwiches. It's a nice break before heading back down. You can take a cable car down if you don't feel like hiking down. Along the way, the splendid mountain sceneries would just awe anyone who likes nature. The majestic Mountain View is just awesome. It makes you feel great for how beautiful nature is. On a sunny day during the winter, like the day after Christmas, the weather is very pleasant. Just wear a long sleeve top for hiking and a hiking pant are good enough to keep you warm. But do bring a wind breaker jacket in case there is strong wind. The weather tends to get windy at times. After rain, you might see snow too. I saw some snows in the shadow parts of the mountain area. But overall, it is a nice hike for family to have a good time. It fits all ages.

Just FYI, the Old Mt. Baldy trail is a different trail to Mt. Baldy's summit than the more popular Devil's Backbone and Ski Hut trails. The Old Mt. Baldy (aka Bear Canyon) trail starts in Mt. Baldy village at the end of Bear Canyon Rd, unlike the other two trails which both start at Manker Flats. Old Mt. Baldy is also more difficult, with nearly an additional 2000 ft of elevation gain compared to the other two and is a 13 mile round trip. Currently, the parking area for Old Mt. Baldy is about a 1/4 mile North from Bear Canyon Rd on the left hand side. This parking pullout is across the street from the trout ponds and has several picnic tables. Bear Canyon Rd is a private road, and parking there is prohibited. Make sure to bring enough water during the Summer as most of the trail is exposed to the sun. Hiking any of the summit trails during the Winter is also only recommended if you have winter mountaineering experience due to icy sections with steep drop offs in some areas.
Very beautiful hiking trail! As you go further into the trail it does become a little harder to hike as its steep. The trail we took had some rocks and there was ice on the ground at times so be careful if you're bringing children with you. I recommend checking this place out, you'll love the scenery!

I love this trail. It is a brutal, gruelling hike up with about a 6000ft elevation gain in under seven miles. This route is way more steep than the Baldy Loop (Manker Flats, Devil's Backbone, ski lifts, the Notch restaurant, etc). None of that is on the out and back trail. But it sure is beautiful and considerably less crowded. I found this trail by mistake after summitting Mt San Antonio from the Manker Flats/ Devil's Backbone route, then mistaking Old Baldy Trail (Bear Canyon Trail) for the Baldy Bowl Trail. By the time I realized my mistake, I was well into the descent so I decided to just go with it. I didn't realize that meant ending up in Baldy Village, about two miles downhill from where we parked. But the owner of the Baldy Lodge restaurant kindly gave us a lift back up to Manker Flats. I'm honestly so glad we made this wrong turn, because we saw the most gorgeous views here. And we didn't see a single person on our descent in April. I came back yesterday (this time beginning on Old Baldy Trail), and the incline is a beast! There is very little shade past the first 2 miles, so facter that into your time and water planning. If you're a real hiking fanatic, I highly recommend trying this route up Baldy. It is very trying and equally rewarding!

This out and back trail is 12 miles with about 5,700 feet of elevation. This hike is also known as Baldy from the Village and Bear Canyon Trail. The trail is single file with loose rocks under foot. The first 2 miles are relatively tame with a steady ascent. However, after this point, if not a bit sooner, the climb becomes fairly steep and steady until a mile or so from the summit. At that point, the climb is pretty easy. There is a lot of traversing with areas that are flat or with descension. The views along most of the way are pretty spectacular. There is an area called 'The Narrow' along this trail, which traverses from a more wooded area to a more exposed, unshaded area. It is reminiscent of Mt Baldy's Devil's Backbone. The scenery is breathtaking. It is possible to take the trail back down, but be mindful that there are some steep areas to maneuver. parking - adventure pass required to park along Mt Baldy Rd

Once upon a time there were five hikers who prepared extensively to hike the Mt. Baldy Trail. They brought 2L of water, crazy amounts of food, jackets, cameras, sunscreen, and other useful objects for their journey. On the day of their fateful journey, they arrived bright and early to Mt. Baldy. They promptly parked at the Manker Flats parking lot at 9:00AM and were quite lucky since the arrival of October meant no Adventure Pass had to be purchased. As the hikers made their way through the Mt. Baldy loop, they traversed through many areas, including the Devil's Backbone, which proved to be quite challenging despite their past hiking experiences. Nevertheless, the hikers remained steadfast and they overcame the Devil's Backbone and reached the summit. At the summit, for the time being, the hikers were happy. Little did the hikers know that their journey would soon take a horrendous turn. After relaxing on the summit, the hikers continued on the Mt. Baldy loop, or so they thought. After 1-2 miles, they had realized they took the wrong trail! Times were tense between the hikers, but eventually with their help of some kindhearted travelers, they made their way back to the correct trail. But alas, Mt. Baldy proved to be quite cruel and the hikers were promptly lost again. Night was coming quickly, and the hikers thought their lives were in great peril. After a 7-mile detour, extensive rock climbing, aimless wandering, and help from more benevolent people, the hikers finally made their way back to their car. They rejoiced at their victory, but the hikers learned one important lesson: ALWAYS STAY ON THE TRAIL, or else sheer exhaustion will cause you to write a crazy pseudo fairy tale Yelp review.

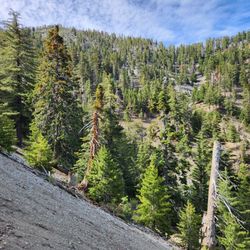
The Old Mt. Baldy Trail takes you from the Mt. Baldy Village to the summit of Mt. Baldy. Of the three most common approaches to Mt. Baldy's summit, this is the most strenuous. To get to the trailhead, drive up Mt. Baldy road and shortly after you get to the Village, turn left onto Bear Canyon Dr. There is parking at the bottom of Bear Canyon Dr on the right, and if you arrive really early, there is also a very small lot at the top just before a gate that states that parking beyond the gate is for residents only. I arrived at 7:30am and got the last spot in the upper parking lot. To get to the trailhead, simply hike up Bear Canyon Dr. The trail is pretty easy to follow and takes you to the summit in about 6.5 miles and 6000 feet elevation gain. The ascent up the Old Mt. Baldy Trail took me about 4 hours. After you get to the summit, if you have the time and the energy, you can take the northern ridge to Dawson Peak and then continue on to Pine Mountain. This side trip will add about 5 miles and 3000 feet elevation gain to your trip totals. However, as of May 24 there was still a significant amount of snow on Baldy's north face and a large portion of the trail along the northern ridge was covered in snow. Besides my trekkiing poles, I did not have any gear for crossing the snow, so I found it easier and faster to skirt the patches of snow on right during the descent. The trail along the northern ridge off Baldy takes you to Dawson Peak. However, the trail doesn't actually go over the summit, so you need to take a small detour off the trail to get to the top. At the peak, there is a man made pile of stones housing a can holding a summit register that you can sign. Leave the summit and continue on the trail to Pine Mountain. This time the trail takes you to the top, and once again, there is a summit register that you can sign. Take a break, and then turn around and head back to Mt. Baldy. It took me about 5 hours to complete this sidetrip, but I probably wasted about an hour trying to get past the snow patches. Without snow, it should be doable in 4 hours. Once you get back to Mt. Baldy, head back down the Old Mt. Baldy Trail. The descent took me about 3.5 hours. As you can see, the entire trip took about 12.5 hours, so an early start is required unless you want to finish in the dark. Therefore, I don't recommend doing the side trip unless you get to the summit before noon or so. Trip totals: 18 miles/9000 feet elevation gain

5 months ago
1 year ago
1 year ago
Beautiful and easy, family friendly trail. It's paved all the way and the incline is not too bad. Very easy to get to, free parking and there are a few restaurants about 20 minutes away. Beautiful place to get away from the city and get your fix of nature. read more


This is not something you just wake up and say, "let's do this," proper training is required. The Old Mt. Baldy trail is the most difficult trail to the Mt. Baldy's summit, and is an entirely different experience than the more popular Devil's Backbone and Ski Hut trails, which are also a challenge, but much easier in comparison. The Old Mt. Baldy (aka Bear Canyon) trail starts at Mt. Baldy village at the end of Bear Canyon Rd, unlike the other two trails which both start at Manker Flats. Old Mt. Baldy is a cardiovascular challenge, with nearly an additional 2,000 ft of elevation gain compared to the other two options, and is a 13+ mile round trip. Currently, the parking area for Old Mt. Baldy is about 1/4 mile North from Bear Canyon Rd on the left hand side. You should park across the street from the Mt. Baldy Lodge Restaurant, or up the street. To play it safe you might want to invest in a $5 parking pass. WARNING, Bear Canyon Rd is a private road, and parking there is prohibited. Make sure to bring enough water during the Summer as most of the trail is exposed to the sun. Hiking any of the summit trails during the Winter is also only recommended if you have winter mountaineering experience due to icy sections with steep drop offs in some areas. Pro tip; bring plenty of hiking appropriate rations, lots of water, and ensure your shoes are properly broken in and that you have adequate socks with plenty of cushion. Several people in my group experienced severe toe bang on the way down and will assuredly lose their toenails. Take your time and enjoy the beauty, this is a LONG but rewarding day. It took 5+ hours for my group going up, and 3+ hours coming down, you can assume a 8+ hour round trip, less if you rush it, but why not enjoy the journey? read more

This is specifically for the Ice House Trail - very pretty hike at about 7.5mi round trip. Love that the first mile will allow you to enjoy a full flowing stream which was very refreshing against the heat. The trail gets a little harder and steeper on its last 1.5mi so come prepared with tons of hydration and snacks. Very picturesque hike with different views of the area along the way. Parking was very easy and there weren't much people when we came at around 1pm on a Friday. The hikers in this area are also the most polite compared to those on other trails! People observe social distancing and about 95% have masks and cover up when close by. read more


I hiked this amazing route on September 28. Arrived at Manker Flats a little after 7 am and it was very cold at the trailhead. Warmed up to a crisp and comfortable high fifties I'd guess for the rest of the day. Extremely windy near and at the summit. Delicious burger at the Notch and a well earned beer preceded the last few miles down to Manker for a Strava reported 13.5 miles, 4,107' of elevation. No bugs. Yeah! This was probably one of the hardest hikes I've done. I would absolutely recommend this to anyone looking for a substantial but doable challenge. It's very easy to follow the route especially when there are so many other people around. That's probably the only downside to this hike - it's not much for solitude but there is a real spirit of comradely adventure and support from your fellow hikers. read more


Oh boy, I didn't realize how brutal hiking could be before I started the six peak challenge with my friends. So far I've completed 4 of the 6 peaks (Cucamonga, Baldy, Mt. Wilson, & San Jacinto) and out of those 4 this one was the toughest to me. We ended up taking the 4 mile scenic tail which is shorter in distance than the other trial which makes the elevation climb a lot harder. Tougher than the climb is the actual trail, as you get closer to the peak in terms of miles the trail ground is a kind of loose so it's harder to just put your feet down and force your way up the hills, you have to pick your spots carefully so you don't lose your footing. You're not in any danger of falling off the side of s cliff or anything, it's just tiring to slide down a little, then regain your footing & keep it going up the steep climbs. Once you make it up to the top there's a great 360 degree view up above. Views of the city below, and mountains beyond & all that other crap you explore the heights of nature for. On your way back down, don't expect to leave the trail quicker than you came, even though you're going down hill it's still a steep climb back down so you have to be just as careful heading back as you were going up. Happy trails folks (Stupid pun intended) read more


4 years ago
Amazing views, it's a difficult trail ( loop ) of 11 miles and about 4000 feet of elevation gain. I made a 4K video about it @ YouTube lopezexplora MT BALDY VIA DEVIL'S BACKBONE TRAIL https://youtu.be/Sh2dwOpt8W4 read more


Fantastic hike on a day after Christmas. Mt. Baldy Trailhead is one of the few family friendly hiking trails in The Angeles National Forest. It's a great trail for all ages. There is an amazing waterfall that's just 10 minutes hike from the parking lot. I saw many families with kids play around at the water fall. I suspect they will just spend their time here. For hikers, another easy to moderate 3.2 miles hike will get you to the notch on top. There is a nice coffee shop there serving coffee and sandwiches. It's a nice break before heading back down. You can take a cable car down if you don't feel like hiking down. Along the way, the splendid mountain sceneries would just awe anyone who likes nature. The majestic Mountain View is just awesome. It makes you feel great for how beautiful nature is. On a sunny day during the winter, like the day after Christmas, the weather is very pleasant. Just wear a long sleeve top for hiking and a hiking pant are good enough to keep you warm. But do bring a wind breaker jacket in case there is strong wind. The weather tends to get windy at times. After rain, you might see snow too. I saw some snows in the shadow parts of the mountain area. But overall, it is a nice hike for family to have a good time. It fits all ages. read more


6 years ago
Just FYI, the Old Mt. Baldy trail is a different trail to Mt. Baldy's summit than the more popular Devil's Backbone and Ski Hut trails. The Old Mt. Baldy (aka Bear Canyon) trail starts in Mt. Baldy village at the end of Bear Canyon Rd, unlike the other two trails which both start at Manker Flats. Old Mt. Baldy is also more difficult, with nearly an additional 2000 ft of elevation gain compared to the other two and is a 13 mile round trip. Currently, the parking area for Old Mt. Baldy is about a 1/4 mile North from Bear Canyon Rd on the left hand side. This parking pullout is across the street from the trout ponds and has several picnic tables. Bear Canyon Rd is a private road, and parking there is prohibited. Make sure to bring enough water during the Summer as most of the trail is exposed to the sun. Hiking any of the summit trails during the Winter is also only recommended if you have winter mountaineering experience due to icy sections with steep drop offs in some areas. read more

8 years ago
Very beautiful hiking trail! As you go further into the trail it does become a little harder to hike as its steep. The trail we took had some rocks and there was ice on the ground at times so be careful if you're bringing children with you. I recommend checking this place out, you'll love the scenery! read more


I love this trail. It is a brutal, gruelling hike up with about a 6000ft elevation gain in under seven miles. This route is way more steep than the Baldy Loop (Manker Flats, Devil's Backbone, ski lifts, the Notch restaurant, etc). None of that is on the out and back trail. But it sure is beautiful and considerably less crowded. I found this trail by mistake after summitting Mt San Antonio from the Manker Flats/ Devil's Backbone route, then mistaking Old Baldy Trail (Bear Canyon Trail) for the Baldy Bowl Trail. By the time I realized my mistake, I was well into the descent so I decided to just go with it. I didn't realize that meant ending up in Baldy Village, about two miles downhill from where we parked. But the owner of the Baldy Lodge restaurant kindly gave us a lift back up to Manker Flats. I'm honestly so glad we made this wrong turn, because we saw the most gorgeous views here. And we didn't see a single person on our descent in April. I came back yesterday (this time beginning on Old Baldy Trail), and the incline is a beast! There is very little shade past the first 2 miles, so facter that into your time and water planning. If you're a real hiking fanatic, I highly recommend trying this route up Baldy. It is very trying and equally rewarding! read more


9 years ago
This out and back trail is 12 miles with about 5,700 feet of elevation. This hike is also known as Baldy from the Village and Bear Canyon Trail. The trail is single file with loose rocks under foot. The first 2 miles are relatively tame with a steady ascent. However, after this point, if not a bit sooner, the climb becomes fairly steep and steady until a mile or so from the summit. At that point, the climb is pretty easy. There is a lot of traversing with areas that are flat or with descension. The views along most of the way are pretty spectacular. There is an area called 'The Narrow' along this trail, which traverses from a more wooded area to a more exposed, unshaded area. It is reminiscent of Mt Baldy's Devil's Backbone. The scenery is breathtaking. It is possible to take the trail back down, but be mindful that there are some steep areas to maneuver. parking - adventure pass required to park along Mt Baldy Rd read more


12 years ago
Once upon a time there were five hikers who prepared extensively to hike the Mt. Baldy Trail. They brought 2L of water, crazy amounts of food, jackets, cameras, sunscreen, and other useful objects for their journey. On the day of their fateful journey, they arrived bright and early to Mt. Baldy. They promptly parked at the Manker Flats parking lot at 9:00AM and were quite lucky since the arrival of October meant no Adventure Pass had to be purchased. As the hikers made their way through the Mt. Baldy loop, they traversed through many areas, including the Devil's Backbone, which proved to be quite challenging despite their past hiking experiences. Nevertheless, the hikers remained steadfast and they overcame the Devil's Backbone and reached the summit. At the summit, for the time being, the hikers were happy. Little did the hikers know that their journey would soon take a horrendous turn. After relaxing on the summit, the hikers continued on the Mt. Baldy loop, or so they thought. After 1-2 miles, they had realized they took the wrong trail! Times were tense between the hikers, but eventually with their help of some kindhearted travelers, they made their way back to the correct trail. But alas, Mt. Baldy proved to be quite cruel and the hikers were promptly lost again. Night was coming quickly, and the hikers thought their lives were in great peril. After a 7-mile detour, extensive rock climbing, aimless wandering, and help from more benevolent people, the hikers finally made their way back to their car. They rejoiced at their victory, but the hikers learned one important lesson: ALWAYS STAY ON THE TRAIL, or else sheer exhaustion will cause you to write a crazy pseudo fairy tale Yelp review. read more


17 years ago
The Old Mt. Baldy Trail takes you from the Mt. Baldy Village to the summit of Mt. Baldy. Of the three most common approaches to Mt. Baldy's summit, this is the most strenuous. To get to the trailhead, drive up Mt. Baldy road and shortly after you get to the Village, turn left onto Bear Canyon Dr. There is parking at the bottom of Bear Canyon Dr on the right, and if you arrive really early, there is also a very small lot at the top just before a gate that states that parking beyond the gate is for residents only. I arrived at 7:30am and got the last spot in the upper parking lot. To get to the trailhead, simply hike up Bear Canyon Dr. The trail is pretty easy to follow and takes you to the summit in about 6.5 miles and 6000 feet elevation gain. The ascent up the Old Mt. Baldy Trail took me about 4 hours. After you get to the summit, if you have the time and the energy, you can take the northern ridge to Dawson Peak and then continue on to Pine Mountain. This side trip will add about 5 miles and 3000 feet elevation gain to your trip totals. However, as of May 24 there was still a significant amount of snow on Baldy's north face and a large portion of the trail along the northern ridge was covered in snow. Besides my trekkiing poles, I did not have any gear for crossing the snow, so I found it easier and faster to skirt the patches of snow on right during the descent. The trail along the northern ridge off Baldy takes you to Dawson Peak. However, the trail doesn't actually go over the summit, so you need to take a small detour off the trail to get to the top. At the peak, there is a man made pile of stones housing a can holding a summit register that you can sign. Leave the summit and continue on the trail to Pine Mountain. This time the trail takes you to the top, and once again, there is a summit register that you can sign. Take a break, and then turn around and head back to Mt. Baldy. It took me about 5 hours to complete this sidetrip, but I probably wasted about an hour trying to get past the snow patches. Without snow, it should be doable in 4 hours. Once you get back to Mt. Baldy, head back down the Old Mt. Baldy Trail. The descent took me about 3.5 hours. As you can see, the entire trip took about 12.5 hours, so an early start is required unless you want to finish in the dark. Therefore, I don't recommend doing the side trip unless you get to the summit before noon or so. Trip totals: 18 miles/9000 feet elevation gain read more


This hike is on the difficult side. About 80% of the hike going up is incline, so you really feel those muscles burn. There is a good amount of shade, which are good rest areas. You really need to wear the right shoes.. I made the mistake of wearing my nikes, but next time I feel I need to wear hiking boots. Also, make sure you wear thick socks and have snacks/plentiful water. At the beginning of the hike there is a waterfall and you see it when you're finishing the hike as well. It's perfect to dip your feet in because the water is very cold and feels refreshing :) It's perfect to take a break at the midpoint, which is where the green cottage is. There are benches for eating, lots of shade and a portapotty. If you're not up for hiking downhill for 5-6 miles and causing strain on your knees, then you have the Option of taking a cable car down from the top. If you hike to the top of the mountain, it is 10,064 ft elevation. I got to the hike at 8 am and finished around 245. read more


7 years ago
11 years ago
Its worth clarifying that this review is for the original trail up Mt. Baldy, the Old Mt Baldy Trail aka Bear Canyon trail (west approach). Its much steeper than the other routes to the summit and now seldom used, except for those hardcore hikers training for Mt Whitney. Its known as being the hardest way up and should only be attempted if you're very well-conditioned. Its separate from the Ski Hut, Baldy Bowl, Baldy Notch or Devil's Backbone trails (all of which start at Manker Flats, about 4 miles up the road from where this trail starts at Baldy Village). Some other reviewers have mistakenly posted those trails here, so wanted to clarify. This is a very strenuous hike and a pretty steep climb the entire way. The trail has a 5744' elevation gain/loss, over 12.8 miles r.t., which is about 1000' of elevation gain per mile. After the first 1.5 miles of a nice shaded trail, almost the entire rest of the trail is loose gravel, mostly exposed. Make sure you bring all the water you need because there is none the entire way. I brought four liters and drank 3.5L. Wear proper hiking shoes/boots and wool socks. Trail runners will not cut it here because of the many rocks you'll have to maneuver around. Definitely bring warm layers for the very windy summit, cold at the top even on a hot day. At the top I put on a light down jacket, fleece hat and gloves. Because of the drought there were only small patches of snow, but normally the snow lingers well into the summer. I hiked this at a much slower pace than usual because of how steep it is and how loose the gravel was. It took me 7 hrs up and 5 hrs back, with frequent breaks on the way up. Somehow it wasn't much faster coming down. I have been doing long hikes with high elevation gains every weekend, but this one was still hard for me. Normally, I hike at 2mph with a pack and this one I did at 1mph. The views from the top third of this trail were phenomenal. On a clear day like I had, one of the most beautiful views I've ever seen. The trailhead starts from Baldy Village (behind the Church, across from Baldy Lodge), about four miles down from Manker Flats. You walk along a private residential area until you see a sign for the trailhead. You need an adventure pass for parking. read more


This is a grueling 12 mile / 5,736 feet elevation gain round trip hike that starts off in the Mt Baldy Village (4,328 feet) and ends up at the top of Mt Baldy, 10,064 feet! On the weekdays you can park in the Mt Baldy Village Church parking lot located on Bear Canyon Road, across from the Baldy Lodge. On the weekend, just park along Mt Baldy Road or by the visitor center. Then walk towards the back of the church parking lot and up the steep asphalt road for 0.4 miles to reach the trailhead. http://www.yelp.com/biz_photos/old-mt-baldy-trail-mount-baldy?select=YKxGWoGLqR8r0VhhZTGgAw#fvbgeT6V-Lv0ImD2JU7iVQ In 0.12 miles you will see 'Old Glory', the oldest Bigcone Douglas Fir tree at 600-700 years old. Amazing! You will also pass by some unique cabins on the way to the trailhead sign. The first 1.6 miles of the trail is really nice as it is shaded from the trees, with the ones along the hillside exposing their intertwining roots. Just below you can hear the sounds of the flowing water from a small creek as you immediately head up the steep switchbacks. After you reach Bear Flats at 1.6 miles, the trail becomes grueling as it heads up a narrow dirt path between the bushes in the open sun with no shade. I found this one mile section to be boring and hot until I reached my halfway up landmark, the 'Split Rock' at 2.9 miles, already climbing 3,800 feet. http://www.yelp.com/biz_photos/old-mt-baldy-trail-mount-baldy?select=YKxGWoGLqR8r0VhhZTGgAw#l-CITFCwJcPZbQLrhqOO2g From here on, it was back to being an amazing trail with some awesome views! Passing through and over large rock boulders, the large pine trees reappeared, the usual Manzanita bushes and even getting excited on a false summit. Then at 4.37 miles and 9,023 feet elevation an AWESOME short ridge crossing appeared, west of Mt Baldy. http://www.yelp.com/biz_photos/old-mt-baldy-trail-mount-baldy?select=YKxGWoGLqR8r0VhhZTGgAw#3ZjGuzU3Kw73MQHwUzDRkQ What a feeling of solitude. Up so high, no one else around except for my pooch Sammy... and just taking in the view. After reaching the summit and taking a short break at 10,064 feet, we headed 225 degrees southwest back towards Baldy Village the same way we went up. This was a challenging hike covering 12 miles and climbing 5,736 feet, but what a day it was! Just six weeks after hiking Old Baldy Trail in the hotter weather I was in the snow and fog! What a difference six weeks can make. http://www.yelp.com/user_local_photos?select=4Wq6Ai6oz4usQhXuY1PMQw&userid=RoGuDu1egfAvVgb4WmZwUw This is the best part of these mountain trails; they offer so many different conditions to keep it all exciting. Just be prepared for them. Have a good pair of gloves, a hat, larger snow baskets for your trekking poles, Kahtoola Microspikes and waterproof your boots. In some conditions, you need to time your passage under the trees just right, to avoid getting hit by the falling clumps of snow and ice falling from the tall trees above. So pack a waterproof jacket or a windbreaker to help keep you dry. Hiking in the snow is such an AWESOME experience. Beautiful views all around. That is until the fog shows up... http://www.yelp.com/biz_photos/old-mt-baldy-trail-mount-baldy#uBqmffsstzx9ibUYk62jeg read more


13 years ago
13 years ago
11 years ago
Love to hike here, you get to really interact with nature and there are different levels for the trails, don't come alone and remember to bring snacks and water because with the heat it really wares you out! Enjoy the scenery and get a workout! read more


10 years ago
Everytime I visit this place its a total blast!! This past visit I went there was snow, during spring and summer you can also come up here to hike or fish. They rent fishing poles, sell sleds, tubes, and snacks. You do have to get an adventure pass to park or you will receive a ticket. read more


12 years ago
11 years ago
Old Mt. Baldy Trail begins near the Visitor Center. Across the street from Mt. Baldy Lodge, walk past the Village Church, continuing beyond Bear Canyon Drive to a sign post pointing to the Mt. Baldy trailhead (6 mi) via Bear Flat (1.6 mi). This is also known as Bear Canyon Trail, the more strenuous of routes to the top of Mt. San Antonio (10,064 ft) in terms of elevation gain. A great trail for solitude. It took us about 5 hours to ascend at a leisurely pace, soaking in all the amazing vistas with liberal breaks for lunch and photos. Going down the same way took about 3 hours and was a literal nightmare. The super slippery rock and dirt prevented us from rushing it. Would strongly suggest returning via an alternate route just to change it up rather than dread the all-too-familiar descent. Definitely wear hiking boots and not running shoes. read more

10 years ago
10 years ago
More info about Old Mt. Baldy Trail
Mt. Baldy Rd & Bear Canyon Dr
Mount Baldy, CA 91759
Directions
Hours
Outdoor Amenities
Ask the Community - Old Mt. Baldy Trail
Review Highlights - Old Mt. Baldy Trail
You might also consider


Why does Yelp recommend reviews?
Old Mt. Baldy Trail - hiking - Updated July 2026
Best of Mount Baldy
People found Old Mt. Baldy Trail by searching for…
Free Snow Play in Mount Baldy, CA
Waterfall Hike in Mount Baldy, CA
Scenic Drive in Mount Baldy, CA
Beautiful Views in Mount Baldy, CA
Things to Do in Mount Baldy, CA
Photo Spots in Mount Baldy, CA
Off Road Trails in Mount Baldy, CA
Sunrise View in Mount Baldy, CA
Campgrounds in Mount Baldy, CA
Rock Climbing in Mount Baldy, CA
Picnic Areas in Mount Baldy, CA
Hiking Trails in Mount Baldy, CA
Scenic Night View in Mount Baldy, CA
Sunset View in Mount Baldy, CA
Places to Take Pictures in Mount Baldy, CA
Hiking Trails Kid Friendly in Mount Baldy, CA
Visitor Centers in Mount Baldy, CA
Browse Nearby
BEST of Mount Baldy, California Parks near Old Mt. Baldy Trail
BEST of Mount Baldy, California Coffee near Old Mt. Baldy Trail
BEST of Mount Baldy, California Restaurants near Old Mt. Baldy Trail
BEST of Mount Baldy, California Scenic View near Old Mt. Baldy Trail
BEST of Mount Baldy, California Things to Do near Old Mt. Baldy Trail
BEST of Mount Baldy, California Visitor Centers near Old Mt. Baldy Trail
BEST of Mount Baldy, California Sledding near Old Mt. Baldy Trail
BEST of Mount Baldy, California Breakfast near Old Mt. Baldy Trail
BEST of Mount Baldy, California Campgrounds near Old Mt. Baldy Trail